This guide explains how to configure a Google Workspace connector in Cloudiway and set up the necessary Google API feeds in the Google Admin Console. This configuration is required for migrations to and from Google Workspace.
Overview
A Google Workspace connector allows Cloudiway to access your Google domain's data including emails, calendars, contacts, Drive files, Sites, and Chat. You can use the connector as either a source (migrating from Google) or target (migrating to Google).
Two Configuration Options
You can either use Cloudiway's predefined service account (faster setup) or create your own custom service account (more control). This guide covers both options.
Prerequisites
Before configuring the connector, ensure you have:
- Super Admin access to Google Workspace Admin Console
- Google Cloud Console access (for custom service account)
- A valid Cloudiway account with an active project
- The migration account credentials (email and password)
Step 1: Create the Connector
- Log in to the Cloudiway Portal
- Navigate to Connectors in the left menu
- Click + New Connector
- Select Google Workspace (or G Suite) as the connector type
- Enter a descriptive name for your connector (e.g., "Google Source - Company Domain")
- Choose the connector role:
- Source - Migrating data FROM Google Workspace
- Target - Migrating data TO Google Workspace
- Select the migration products you need (Mail, Drive, Sites, Chat, etc.)
Step 2: Configure Required Fields
Complete the following configuration fields:
Domain Configuration
| Field | Description | Example |
|---|---|---|
| Domain Names | Primary and secondary domains to manage | company.com, company.org |
| Migration Account | Super Admin email for API operations | admin@company.com |
| Migration Account Password | Password that won't change during migration | ••••••••• |
Super Admin Recommended
Additional Fields (for Sites and Groups)
If migrating Google Sites or Groups, also configure:
- Phone Number - Required for 2-step verification if enabled
- Favorite Logon Location - Helps avoid Google security alerts
Service Account Configuration
Choose one of these options:
Option A: Cloudiway Service Account
Use Cloudiway's pre-configured service account for faster setup.
Client ID: 114818336788408865729
Option B: Custom Service Account
Create your own for full control. See our service account guide.
Provide: Client ID, Private Key JSON

Step 3: Set Up Domain-Wide Delegation
You must authorize the service account to access your domain's data through domain-wide delegation:
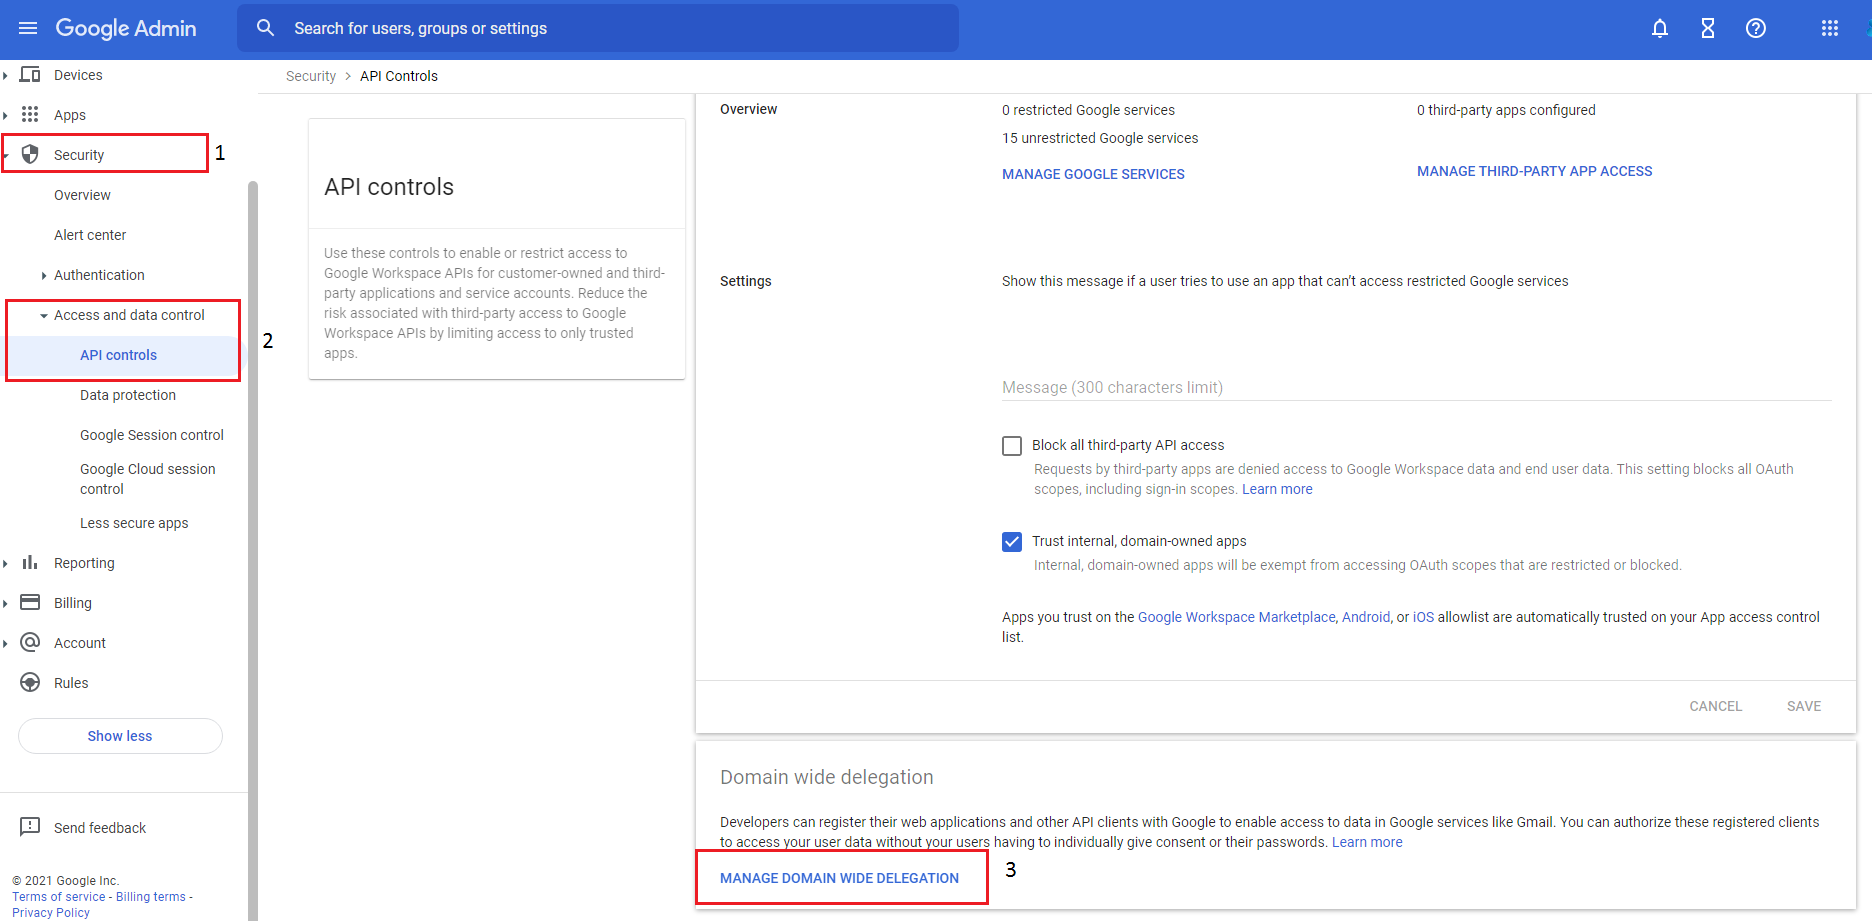
- Sign in to the Google Admin Console
- Navigate to Security → Access and data control → API Controls
- Click Manage Domain Wide Delegation
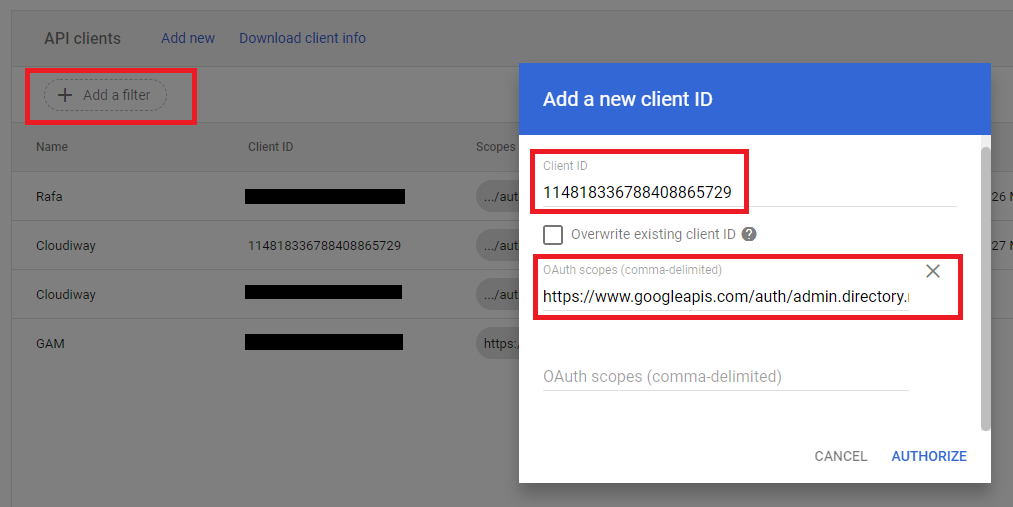
- Click Add new
- Enter the Client ID:
- For Cloudiway's account:
114818336788408865729 - For custom account: Your service account's client ID
- For Cloudiway's account:
- Paste the required OAuth Scopes (see next section)
- Click Authorize
Propagation Time
Step 4: OAuth Scopes by Migration Type
Copy and paste the appropriate OAuth scopes based on your migration needs:
Mail Migration Scopes
https://mail.google.com/
https://www.googleapis.com/auth/gmail.modify
https://www.googleapis.com/auth/gmail.settings.basic
https://www.googleapis.com/auth/gmail.settings.sharing
https://www.googleapis.com/auth/calendar
https://www.googleapis.com/auth/contacts
https://www.googleapis.com/auth/tasks
Drive/Files Migration Scopes
https://www.googleapis.com/auth/drive
https://www.googleapis.com/auth/drive.file
https://www.googleapis.com/auth/drive.metadata
Sites Migration Scopes
https://sites.google.com/feeds/
https://www.googleapis.com/auth/sites
Groups Migration Scopes
https://www.googleapis.com/auth/admin.directory.group
https://www.googleapis.com/auth/admin.directory.group.member
https://www.googleapis.com/auth/apps.groups.migration
Chat/Spaces Migration Scopes
https://www.googleapis.com/auth/chat.spaces
https://www.googleapis.com/auth/chat.messages
https://www.googleapis.com/auth/chat.memberships
Complete Scope Set (All Products)
For full migration capabilities, use all scopes combined:
https://mail.google.com/,https://www.googleapis.com/auth/gmail.modify,https://www.googleapis.com/auth/gmail.settings.basic,https://www.googleapis.com/auth/gmail.settings.sharing,https://www.googleapis.com/auth/calendar,https://www.googleapis.com/auth/contacts,https://www.googleapis.com/auth/tasks,https://www.googleapis.com/auth/drive,https://www.googleapis.com/auth/drive.file,https://www.googleapis.com/auth/drive.metadata,https://sites.google.com/feeds/,https://www.googleapis.com/auth/sites,https://www.googleapis.com/auth/admin.directory.group,https://www.googleapis.com/auth/admin.directory.group.member,https://www.googleapis.com/auth/apps.groups.migration,https://www.googleapis.com/auth/chat.spaces,https://www.googleapis.com/auth/chat.messages,https://www.googleapis.com/auth/chat.memberships
Step 5: Test the Connection
- Return to the Cloudiway Portal
- In your connector configuration, click Test Connection
- Wait for the validation to complete
- If successful, you'll see a green success message
- Save the connector configuration
Connection Failed?
- Domain-wide delegation is properly configured
- All required OAuth scopes are authorized
- The migration account has Super Admin rights
- The service account Client ID is correct